
Are you having trouble with the fingerprint scanner on your Samsung Galaxy A52? Is it not working as it should be? Don’t worry, we’ve got you covered with some effective solutions.
In this post, we’ve compiled a list of tips to help you troubleshoot and fix any issues with the fingerprint scanner on your Galaxy A52.
Tips to Fix Galaxy A52 Fingerprint Scanner Issue
1. Ensure your thumb is clean
If your thumb is dirty, it can mess with the fingerprint scanner. Make sure your thumb is clean to ensure the fingerprint scanner is able to read your fingerprints correctly.
2. Restart the phone
Random system glitches can cause issues with your phone’s functionality including the fingerprint sensor. Try restarting the phone and see if the fingerprint sensor problem clears. Doing this will eliminate any existing flaws that may be affecting the fingerprint sensor.
To restart the device, perform the following steps:
- Press and hold the side button and volume down key together until the Power Menu appears
- When the Power Menu appears, tap the “Power Off” or “Restart” button
3. Wipe the screen clean
If your phone screen is dirty, it can interfere and mess with the fingerprint sensor. Make sure the screen is clean to ensure the fingerprint scanner is able to read your fingerprints correctly.
4. Use compatible screen protectors
Using unofficial or unsupported screen protectors can affect the normal functioning of the fingerprint sensor. If you are using unofficial screen protector, try removing it and see if that resolves the problem. If it doesn’t, proceed with the next solution.
5. Turn on touch sensitivity
Certain screen protectors can affect the touch sensitivity including the fingerprint scanner. Try turning on the touch sensitivity and see if that helps fix the problem.
Here’s how to increase the touch sensitivity:
- Open Settings
- Then tap on Display
- Next tap the Touch sensitivity and toggle the switch On
6. Rescan fingerprints
Your fingerprints can change overtime due to wear and tear and other factors. Try removing your old fingerprints and rescanning new ones. When you rescan your thumb, do not press too hard. Just light touch your thumb on all sides. This will improve the fingerprint recognition.
Procedure to remove old fingerprints:
- Open Settings
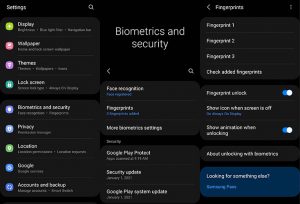
- Scroll down and tap on Biometrics and security
- Tap on Fingerprints
- Type in the PIN, Password, or Pattern if prompted
- Select the fingerprints to remove. To select all, touch and hold a fingerprint then select All from the upper-left corner
- Tap on Remove (top right corner). Then confirm to remove the fingerprint(s)
Procedure to add new fingerprints:
- Go to Settings
- Tap on Biometrics and security
- Tap on Fingerprints
- Type in the PIN, Password, or Pattern when prompted
- Tap Add fingerprint. Enter the current PIN, Password, or Pattern if prompted
- Follow the on-screen tutorial to scan your fingerprint
- Tap Done to add the fingerprint
Note: Ensure the screen protectors are removed from the phone and your fingers are cleaned properly before proceeding with the new fingerprint registration.
7. Update software
If a bug is causing the fingerprint scanner problem, updating the software may resolve the problem. To check and install software updates, perform the following procedures.
- Go to Settings
- Tap on Software update
- Then tap on Download and install to download and install the update.
8. Wipe system cache partition
A corrupted or damaged system cache can cause issues with the fingerprint sensor. To wipe and rebuilt the system cache partition, perform the following steps:
- Turn off your phone
- Connect your phone to the PC via USB
- Wait until the message shows your phone is being charged
- Press and hold the Volume Up key and the Power key.
- Continue to hold both keys until Android Recovery menu options appear
- Press the Volume down key and navigate to Wipe cache partition
- Press Power key to select
- Press the Volume down key to highlight Yes, then press the Power key to select
- When the process is complete, Reboot system now is highlighted
- Press the Power key to restart the device
9. Factory reset the phone
If the above solutions do not work, you can try factory restore as the last resort. But before you do so, back up all your important data and files as the procedure will erase them completely.
To perform factory reset, follow the steps below:
- Go to Settings
- Tap on General management
- Tap on Reset
- Tap on Factory data reset
- Scroll down and tap on the Reset button
- Tap the Delete all button to proceed with the reset
Alternatively, if you are locked out of your device, you can use another method to perform the reset. Here’s how to do that.
- Turn off your phone
- Connect your phone to the PC via USB
- Wait until the message shows your phone is being charged
- Press and hold the Volume Up key and the Power key.
- Continue to hold both keys until Android Recovery menu options appear
- Press the Volume down key and navigate to Wipe Data/Factory Reset
- Press Power key to select
- Press the Volume down key to highlight Factory data reset, then press the Power key to select
- When the reset process is complete, Reboot system now is highlighted
- Press the Power key to restart the device
Conclusion
If none of the above solutions are working, the problem could be a hardware defect. Visit your nearest Samsung care center for further assistance.