It is common knowledge that an Amazon Echo is one of best digital devices available to play music through voice commands. If you’ve always wished to buy your own Amazon Echo and listen to Alexa’s voice all day but couldn’t do so then we have the perfect DIY for you. Use a Raspberry Pi 3 or 2 to create your very own Amazon Echo! You will need a few simple supplies and a few steps need to be followed and voila! In no time you will have access to Alexa! This DIY is a must try! Read on to learn how to build your own Amazon Echo using a Raspberry Pi.
What Do You Need?
In order to create your own Amazon Echo, you will need a few simple supplies which are as follows:-
- Raspberry Pi 3 OR Raspberry Pi 2
- USB Micro USB Power Cable
- USB 2.0 Microphone - Can be purchased from Amazon
- Speakers- You can use any powerful speakers
- A Wi-Fi Connection
- Wi-Fi Adapter if you are using the Pi 2 since Pi 3 has a inbuilt Wi-Fi
- A mouse and a keyboard for the set up
Everything listed above can be purchased from Amazon. Plug in and connect everything together in order to start building this device.
Getting Started
In order to create your own Echo, you are required to use Alexa Pi from the Git Hub Project. This replicates Alexa’s voice on your Raspberry Pi which is identical to what Amazon uses on Echo. This is a comparatively better method of building your Echo instead of the other alternative that involves running 3 separate Terminal Windows.
Step 1
Sign up for a free Developer account from Amazon. Log in and follow the steps listed below:-
- Log in to your Account
- Select the Alexa option by clicking on it
- Register your product type
- Choose a name for your device
- Select “Create New Profile” option
- After the creation of your profile, note down the Client ID, password and Product ID that is provided to you
- Then proceed to select the web settings tab and select edit situated near the profile drop down box
- Select the “Add Another” tab next to the allowed origins and key in - http://localhost:5050
- Select Add Another” again and type http://your.raspberrypi.ip.address:5050 to replace it with your.raspberrypi.ip.address using your Raspberry Pi’s IP address
- Choose the “ Add Another” tab near the allowed returns URL and key in this link http://localhost:5050/code
- Click on ”Add Another” again in order to enter http://your.raspberrypi.ip.address:5050/code and then continue to enter own information instead of the your.raspberrypi.ip.address. Select next to go to proceed further.
- Fill in the details of the project and enter 0 in the space that requires the number of devices you wish to use the service on.
Step 2
- After you have finished creating an account as an Amazon Developer, you will be required to install a few things.
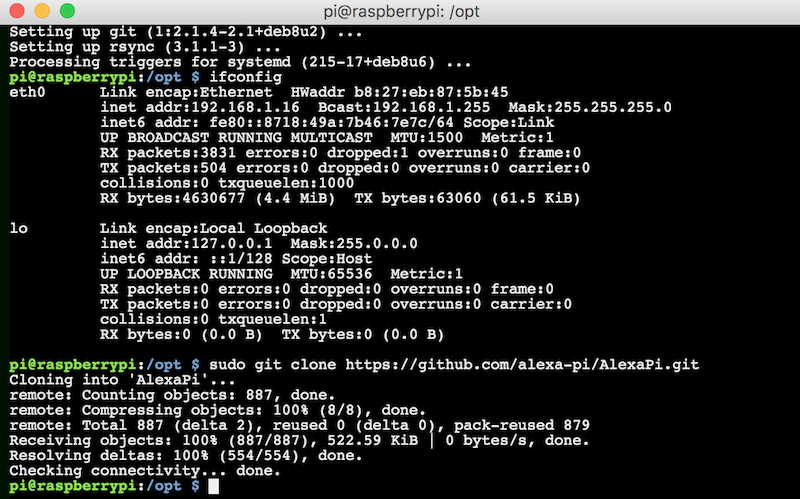
- Type sudo apt-get install update in order update the Raspbian
- Next, begin the installation of Git by entering sudo apt-get install git
- Alter the directory by keying in cd /opt
- The last and final step of this procedure is to type sudo git clone https://github.com/alexa-pi/AlexaPi.git to replicate the Alexa Pi.
Step 3
Final Installation of Alexa Pi is the last step which will take you close to your very own version of Amazon Echo.
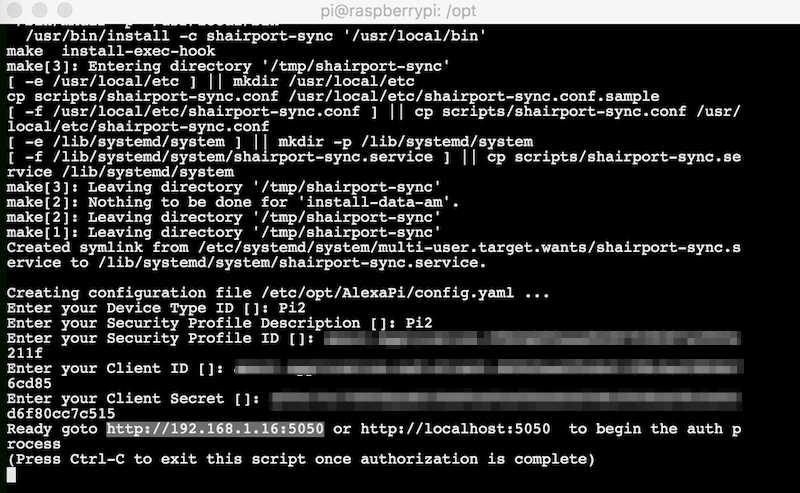
- Paste sudo ./AlexaPi/src/scripts/setup.sh
- You will then have to select many options according to the questions asked. You are also given an option to select airplay support which is beneficial for playing music from your iOS devices. A number of downloads will then take place in the next 10 to 15 minutes.
- The next step requires you to enter your account information such as Device Id and other security questions.
- Device Authorization is the last step. Open browser to type ttp://your.raspberrypi.ip.address:5050 and enter your raspberry IP address in the link raspberryi.ip.address.
- The installation is then complete and now you need to log in to your developer account again and generate an Authorization.
- In order to start using the device, you simply need to reboot your device or enter sudo systemctl start AlexaPi.service.
- In order to see if it is working, just say Alexa into the mike and you should receive a yes as a reply. In case if you do not receive any reply, you can paste sudo systemctl status AlexaPi.service to check if it is working.
- You can now remove the mouse and keyboard to start using your device.
Follow these simple steps to build your own Echo in a jiffy!