When it comes to Android ecosystem, Samsung remains the uncontested and undisputed king. The company has come with the S20 series phones that are geared towards those with deep pockets.
With a starting price of $1,000, the top of the line model, the S20 Ultra burns a hole as big as $1,400 in your pocket.
Nonetheless, if you are a proud owner of any of the three models in the Galaxy S series, we bring to you a few tips and tricks that will push you to a pro-level user of this shiny and slippery gizmo!
Read on…
Best Samsung Galaxy S20, S20+ and S20 Ultra tips and tricks
1. Enable the Built in Dark Mode
Unlike other phones that will allow you to use dark themes or allow individual app-level dark mode [provided the app has a dark mode], Samsung has up the ante in this field. The S20 series phones – all three models – ship with a built-in dark mode.
A dark mode is always soothing to eyes and saves a lot of battery. And, it looks cool too! All it takes is a single tap to enable this feature in your new S20 or S20+ or S20 Ultra. In order to enable that, head over to the Display settings of your phone.
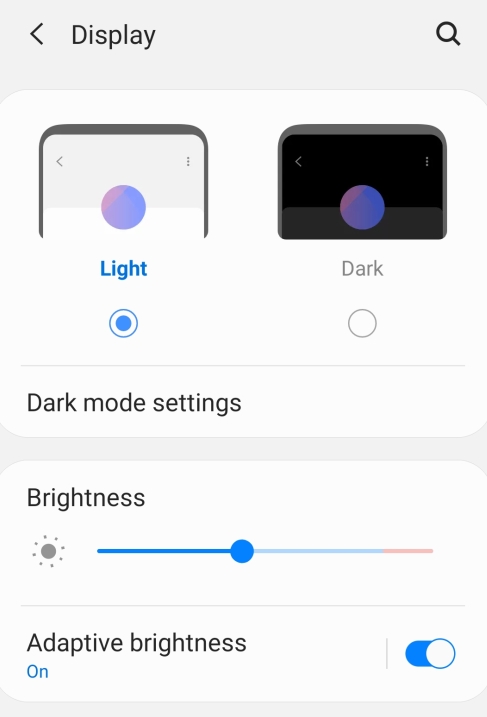
The first thing you see is the option to choose from Light mode and Dark mode. All it takes is just a tap. Didn’t we tell you?
2. Motion smoothness
If you like mobile gaming or if you want to see animations that are more realistic or want far smoother scrolling, you can switch from standard 60 Hz refresh rate to a whopping 120 Hz refresh rate. This feature is what they call Motion smoothness.
Of course, the standard 60 Hz is set by default to prevent quick battery drainage but you can manually enable the 120 Hz refresh rate.
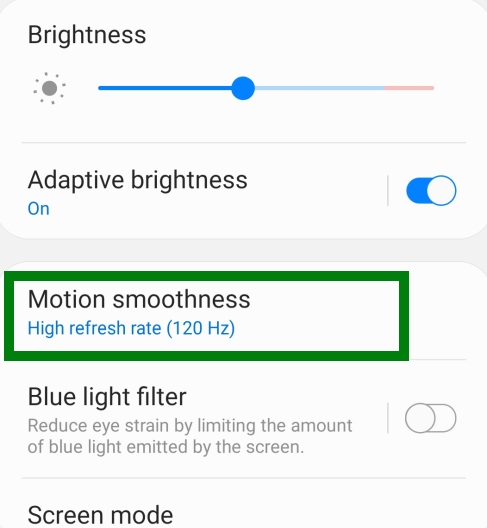
To achieve it, head over to your phones Settings and then Display Setting. There you can find the option of Motion smoothness. Tap on it to get two options. Select the High Refresh Rate option.
Remember, 120 Hz will not work for WQHD+ resolution. It works only for HD+ and FHD+ resolutions.
3. Music Share
This feature is Gold! We mean it! Have you ever run into a situation where a friend of yours wants to connect his or her phone to your Bluetooth speaker? What do you do in such a case? You disconnect the primary phone [your phone] from the speaker and then pair up your friend’s phone with the speaker.
That’s a lot of hassle. With Music Share you can just eliminate the problem by making your phone act as a conduit or a channel for connecting their phones to your speaker without you having to disconnect from the speaker.
Basically, your phone becomes a hub! To enable this feature, follow the steps below:
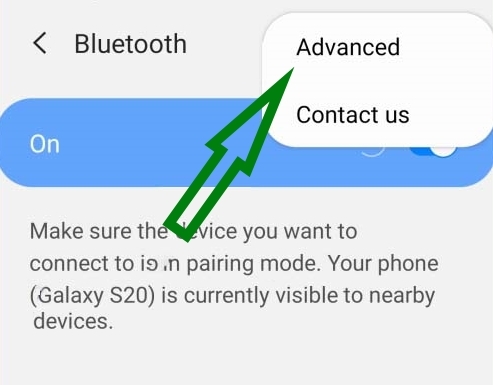
- Head over to Settings >> Connections >> Bluetooth.
- On Bluetooth settings screen, go to Advanced >> Toggle on Music Share.
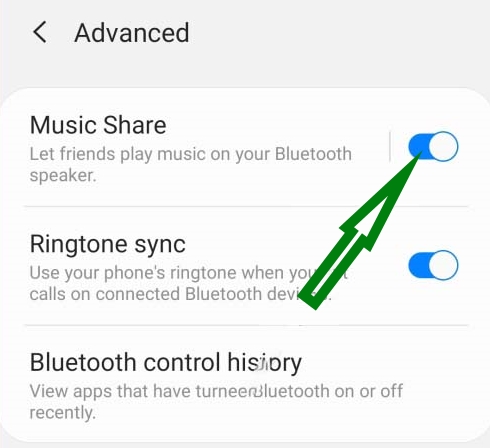
That’s all! But, do remember to play around with the other settings like who can share your device, how long will the option be available when nothing is playing and whether permission is required to connect or not. Be wise in your selections!
4. Quick Share
Want to send multiple files to some other phone? Enable Quick Share which uses the Wi-Fi Direct technology to send files at high speed! Yes, this feature allows you to send big files to another phone in a jiffy!
The setting for this option is a bit complicated but not really rocket science. Here is what you need to do:
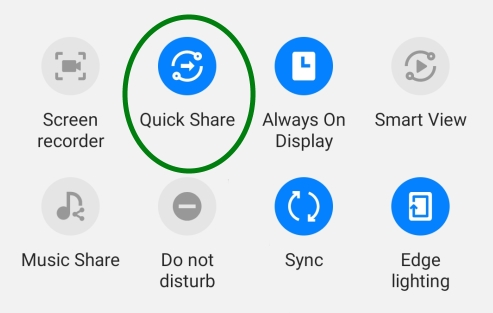

- Pull out the quick settings menu and locate the option of Quick Share.
- Tap and hold on the Quick Share option to pull up the Quick Share settings and choose the option of who can share with you. You can allow it for everyone or for contacts only.
- Give your phone a nice name so that it is instantly recognized by others.
The settings for your phone is complete. Now head over to the other phone where you want to send files and pull out the quick settings menu. Locate the Phone Visibility option and turn it on by tapping on it.
Now go back to your phone and on the sharing screen you should be able to see all the available and compatible devices where you can send files using Quick Share. Select the phone where you want to send the files and your transfers should complete in a jiffy!
5. Attend Calls or Text from Other Devices
You are going to absolutely love this feature if you have another Samsung device. With this feature, if you have any other Samsung device linked to your Galaxy S series device, you can receive calls or text on the linked device when your S series device is not on you.
Here is how you can make it work:
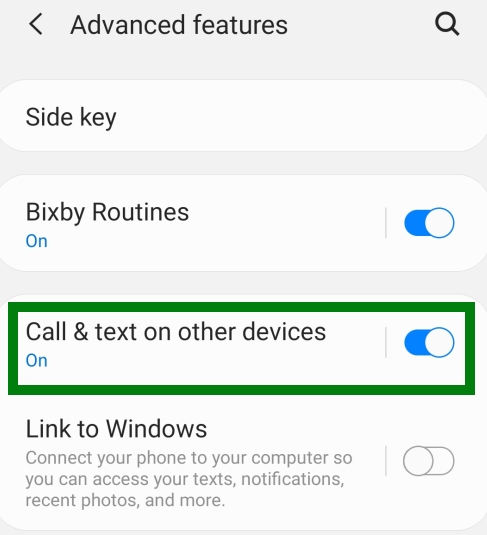
- Head over to your S20 or S20+ or S20 Ultra’s ‘Settings’ segment.
- From there, go to ‘Advanced’ settings and then to ‘Call & Text on other devices’ and toggle on that option.
- Once you toggle it on, the new settings window for ‘Call & Text‘ on other devices will open up where you can see the connected devices. Turn on the device that you want to use using the toggle button.
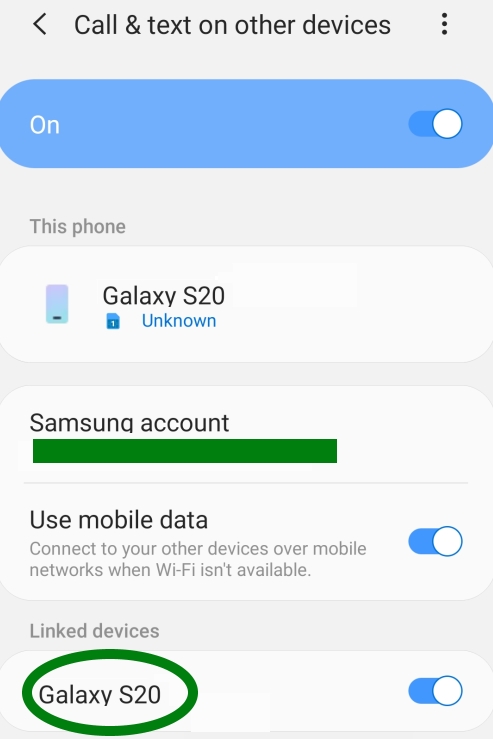
Please note that in order to use this option, you will need to be signed in using your Samsung ID and you need to make sure that you are signed in on both the devices. Also, this option will work either on mobile data or Wi-Fi. So, you need to have active Internet connection. Wi-Fi is definitely a better choice.
6. Connect Your Phone to Windows PC
What if you could really access your phone’s content like photos, notifications, texts etc. directly on your PC? That would be really great! Your Samsung Galaxy S series phone will allow you to do so provided you sign into your Microsoft account from both your PC and your phone.
In order to activate this feature, follow the steps mentioned below:
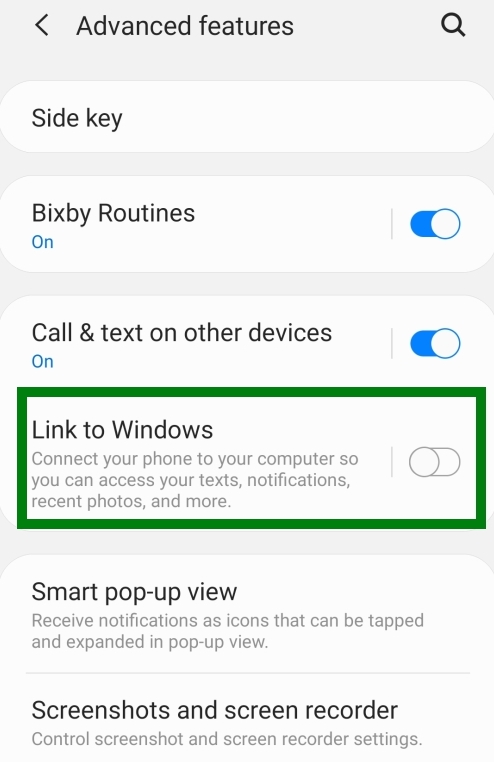
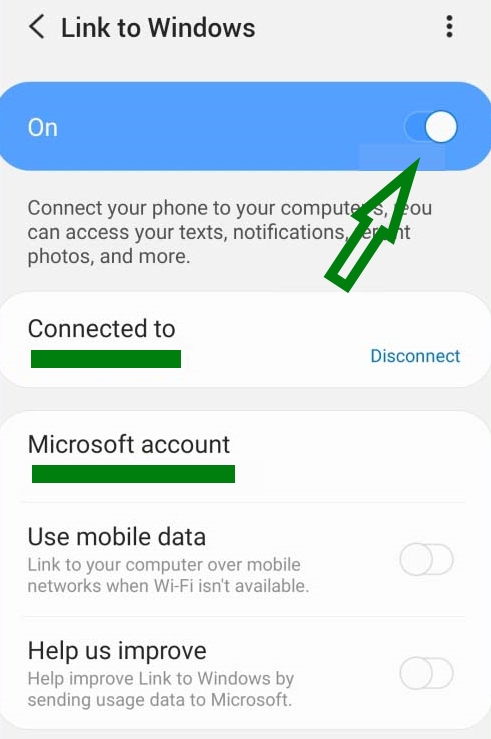
- Go to Settings >> Advanced Settings >> Link to Windows [turn it on by toggling the button].
- On the ‘Link to Windows’ screen toggle on the first option which says ‘On’ and then take care of the rest of the settings on the screen.
Voila! Your phone is now connected to your Windows PC! How cool is that?